Not sure if Elementor is the right page builder plugin for your website? In this Elementor review, we’ll show you what this tool is all about, talk about the different pricing options available, list all of its pros and cons, and help you to decide whether or not to use it.

What is Elementor?

Before we begin our Elementor review, let’s look at what Elementor is and how it works.

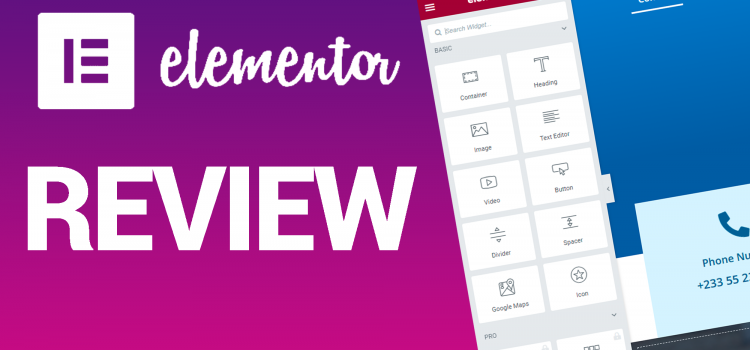
It is a visual drag-and-drop page builder plugin. When you design your content, you can see exactly what your visitors will see thanks to visuals. There is never any uncertainty over how your page will seem after it is published.

Drag and drop refers to the ability to simply drag and drop different design elements, such as buttons, forms, or images, to change their location. The best thing about Elementor is that no HTML, CSS, PHP, or coding knowledge is necessary because everything can be done using a simple user interface.

Unlike the default post/page templates that come with your WordPress theme, Elementor enables you to create customized, authentic-looking posts and pages. The majority of your work doesn’t take place in the default block editor that comes with WordPress; instead, you get a completely distinct interface to work on your posts and pages.

It functions both through the front end and the backend, allowing you to see precisely how it will appear as you construct it. The best part is that it overrides the capabilities of your current WordPress theme, so even if you choose the least expensive option, you can still do whatever you want with your website and make it more appealing and useful than you can ever think. Additionally, it supports all of the available WordPress themes.

Regardless of what your current WordPress theme enables you to do, you may use it to create any content layout or page layout you can think of. It is compatible with all WordPress themes, allowing you to maintain your present look while taking advantage of all of Elementor’s features.

Benefits of Elementor (Elementor Review)

This part of the Elementor review will expand on some of the perks and benefits of using the Elementor Page Builder.

Full Control of Your Theme

Elementor has a lot of wonderful features, one of which is the ability to visually design every component of your website. You can now fully control every element of your website and are no longer limited to using pre-designed themes.

This implies that you can give clients the precise design they desire and produce a website that precisely captures their brand. This also implies that as and when necessary, your website can be quickly modified and improved over time.

Drag-and-Drop Capabilities

You may drag and drop your content sections—also referred to as blocks or widgets—to relocate them wherever you want. This implies that any content can be placed wherever. If you had trouble with this in a previous WordPress theme, you will appreciate how useful this feature is.

All content types that the Elementor plugin supports are included in here. Images, image galleries, carousels, headlines, text, videos, dividers, spacers, buttons, client testimonials, social media icons, and a whole lot more are included in this.

What You See Is What You Get (WYSIWYG)

You build your page using Elementor in a “what you see is what you get” approach, as was already described. It has a live preview so you can see precisely how your page will appear after publication. There are therefore no surprises.

Quick and Easy to Build Websites

Everyone wants a quick and simple approach when creating a website, while also churning out excellent pages. Because of Elementor’s ability to run smoothly, designs may be swiftly completed for clients without keeping them waiting for extended periods of time while it is being developed.

Building new websites without Elementor’s sophisticated features can be a time-consuming and difficult task. With the use of adjustable features like fonts, enhanced background photos, and motion effects, this powerful and simple builder may easily create a one-of-a-kind website design.

Responsive Websites

You must make sure a website is responsive when developing it. You can modify the design using Elementor’s features to make it perfect for any device. You can make adjustments to your pre-designed pages in tablet, PC/laptop, or mobile mode to ensure that everything fits properly.

Additionally, you can use responsive mode to adjust any aspects of the site to make them all compatible with and functional on all devices. These technologies enable the creation of a responsive website that operates on all gadgets.

Flexible Layout Controls

Because page builders do away with the necessity for bespoke coding, you occasionally have to give up a little freedom in how you arrange items to achieve that simplicity.

But the beautiful thing about Elementor is that it provides you with a ton of simple controls that let you position each widget, section, and column precisely where you want them. One can:

  • Padding and margin can be manually set for sections, columns, and widgets.
  • Simply sliding the spacer between columns will change the width of the columns.
  • Put widgets in a column vertically (or columns within a section)
  • By adjusting the column spacing, you can leave a blank area between the columns.

Advanced Widgets

A number of essential widgets and functionality that are essential to any web developer are included in Elementor. It has features like a media carousel, slides, animated headlines, post widgets for displaying blogs, and WooCommerce widgets. These are essential for building a polished, distinctive, and well-designed website since they make yours stand out from the competition.

Elementor Pricing

It’s free for starters, but there’s a Pro edition available as well. However, you don’t really need it to enjoy, say, 90% of Elementor’s awesomeness. Access the primary plugin through the official WordPress repository. There are no additional fees or registrations required. It simply works!

This is the pricing at the time of writing this Elementor review.

elementor-review-pricing

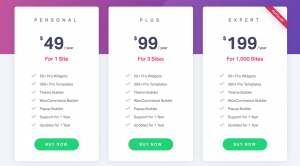
Regarding that Pro edition now. Granted, it includes some intriguing content that power users will find fun:

  • 50-plus additional content elements/widgets.
  • 300-plus additional page templates.
  • Theme Builder (the module where you can change the headers and footers of your current theme).
  • WooCommerce Builder (the widget that allows you to rebuild your WooCommerce product pages).
  • Popup Builder (a module where you can build pop-ups and have them integrated with either an opt-in form or some special offer/discount).
  • Visual Form Builder (comes with integrations with popular marketing tools).
  • You can create Global Widgets and then reuse them throughout the site.
  • Add custom CSS to any Elementor block.
  • Deploy Elementor elements in sidebars and widgets.

Elementor Review Conclusion

To conclude this Elementor review, Elementor ought to be your go-to tool if you require a fantastic free drag-and-drop page builder plugin for WordPress. Despite the fact that there are other options available, Elementor stands out as the only one that is user-friendly for everyone (including beginners) and doesn’t require you to switch to a costly license.

If you liked our Elementor review, check out our top picks of website builders in 2022.


7 Best WordPress Website Builders-No Coding? No Problem

You might want to rely on website builders if you want to pursue a career in website design without any coding experience. These are usually plugins that will allow you to build pages on your website. In this article, I’ll look at the top 4 website builders that produce excellent results.


Elementor

This was the first website builder I ever used in designing, so I may be a little biased. That notwithstanding, this is probably the best page builder on WordPress, especially for beginners.  This plugin allows you to drag and drop sections or divs, headings, paragraphs or text blocks, and so many other options, which would otherwise have taken you hours to code. This website builder is compatible with most themes on Envato and Themeforest. So you wouldn’t have trouble working with the Elementor page builder if you import the demo content from a bought theme. Everything on a page is customisable, and you can add images and videos too. It’s very easy to add cool animations on the entrance and on hover, giving your website a nice touch. The only drawback is that adding custom CSS is a premium feature, which wouldn’t be that valuable to a beginner.


WPBakery

WP Bakery website builder has a steep learning curve compared to Elementor but is great all around. It has both a frontend and backend editor for web designers who prefer either one. The backend editor is pretty comprehensive, with the ability to add various widgets like texts, images, forms, shortcodes and more. The frontend editor gives you a first-hand feel of how the website looks in real time as you add and edit blocks of the web page. Widgets work well, but sometimes the UI can get clunky when you’re navigating through multiple widgets. Another great feature of this website builder is that you can save templates of your work that you can use on another page or the same page. The free version is quite limited, although it has the Custom CSS option missing in Elementor. This website builder as mentioned earlier will take a while to get used to and can be frustrating trying to find certain quick settings, like paddings and margins. This builder is supported by several themes, so integration should not be an issue if you decide to stick with this builder.


Bebuilder

I found out about BeBuilder recently, but in my opinion, is one of the best backend editors in the website building industry. The widgets and options are laid out clearly it’s easy to understand as a beginner. As with the other builders on this list, this builder allows you to add all kinds of media to your web pages without hassle. This builder also has the most features in the free version out of the three on this list. You can edit web pages and add widgets by simply dragging and dropping them into desired locations. If you’re coming from Elementor, then you’ll feel right at home. This is because they have similar UI and functionality making it easy for Elementor users to adapt. I’ve had instances where some settings were not implemented when I made them using the frontend editor. This is the case for padding, image sizes and margin settings. Generally, I have not dealt with any other bugs or issues with this website builder.


Unyson Builder

I went back and forth between Unyson and BeBuilder, but ultimately, Unyson is strictly a backend editor, so BeBuilder takes the nod here. However, Unyson has a neat layout that makes it easy to visualise what your page will look like without having to edit on the front end. One of the perks of this builder is that it has a rich library of icons to work with to improve your website. However, the customisation options are limited compared to the others in this list. This website builder is also robust, and sometimes it’s hard to make the smallest of changes. Overall it’s still a great alternative to the aforementioned builders.


Visual Composer

Like WPBakery, Visual Composer is one of the biggest learning curves among all the website builders out there today. It’s a drag-and-drop page builder with sufficient elements and widgets to build a basic page. It has both a backend and frontend editor, giving you the freedom to edit your website as you please. The free version is quite limited though, with all the bells and whistles in the Pro version. The paid version is also expensive compared to other Pro versions of other website builders. It can be sluggish sometimes, though rare, and changes may not reflect until you clear the site cache, which can be frustrating. Overall, this web builder is consistent and gets the job done.


Beaver Builder

If you’re a beginner in website builders and web designing, then Beaver is a great option for you. The interface is intuitive and clear; it will only take a few minutes to understand how it works. Elements and widgets are laid out cleanly so you know exactly what to do. It’s a frontend editor, so designers can have an idea of how each element is implemented on the page. You can also save your own templates to use them globally throughout the site. For instance, when you build a section for a promotion a business is running, you may want it to be shown on multiple pages. Instead of building from scratch on every page, you can save the first section as a template and implement it on the other pages. The paid plan is some of the most value for money on the market as it allows you to use it on multiple websites.


Divi Builder

Divi is another beginner-friendly page builder on this list. It’s a fully drag-and-drop frontend editor and its flexibility allows users to explore different looks of their pages. You can create several complex but responsive pages to make your website stand out. The builder comes with multiple themes that may suit your goal. These themes are fully editable; you can edit texts, images, videos, icons, etc. You can also build a website from scratch if you want to as well. The lifetime access is cheaper compared to other builders, and you can build pages on an unlimited number of websites.


If you have passion for web design but no time to code, no problem. You can watch this tutorial here on how to build an informational site using the Elementor website builder. Learning at least two builders will safeguard you and set you up to be able to handle most themes you might have to work on.

Check out this article:  5 Top Free WordPress Plugins for Every WordPress Website – 2022

How to Import Demo Data In WordPress


Sometimes, you don’t want to build a website from scratch. Or you’ve seen a theme that fits with your vision for how your website should look. Several sites provide free and paid themes, like
Envato and Themeforest. After buying and/or downloading your desired theme, it is easy to install and import demo data in WordPress.

When buying a theme, check that it includes documentation, licenses, and a demo. These will make it easy to import the whole site. Any theme you buy or download will contain all the plugins needed for the theme to function properly.


After buying the theme:

  • You’ll receive a download link for all the files and documentation needed to install and customize the theme. Included is a link to the theme documentation. This documentation will provide step-by-step guidance on editing themes.


  • Install and activate the All-in-one Migration plugin. As discussed in another post, I think this is the best plugin to install themes with ease. This plugin can also help you back up your current theme or website if you want to try a different theme.


  • It’s time to install the demo. In the files you downloaded, there should be a .zip file. That contains the theme we’ll be importing. You don’t have to extract the .zip file so leave it as it is. You can either leave this window open so you can just drag and drop the file into the importer, or copy the file path to use later.


  • After activating the All-in-one Migration plugin, check the options panel for the plugin name, and hover your mouse on it to reveal more options. Click on Import.


  • Now select the source you’re importing the site. You can upload from a vast list of accepted locations. Click on “File” from the options. Choosing “File” means you’re uploading a file from your PC. If you have a site in your dropbox or Google Drive, you can select that.


  • A new File Explorer window will pop up. Open the file location of the .zip file and select it. You can also drag and drop the theme file onto the space provided for a quicker upload.


  • A dialogue box will appear, warning you about the new theme overwriting the entire website. This will wipe out everything including previous databases, media, previous themes, and plugins. Your blog posts are however safe. Click on Proceed to begin the import process.


  • The bigger the import demo size, the longer you will need to wait for the import to complete. Do not close the window (i.e. your browser) while the website is being imported. This will cause the import to fail.


  • Once it’s done, your website is ready. You can choose to view the website now or do that later. The only thing left to do is update your permalinks. Hover on Settings and click on Permalinks. You don’t need to change the structure, click on Save to update it.


At this point, you have imported your website. Go ahead and customize and personalize it for your business or personal use. You can also use this procedure to install a backup of your website.

How to Create a Free WordPress Blog Website In 2022

If you’ve ever wanted to start a blog website to exhibit your writing skills, then WordPress is the best platform to begin. Other competitors (Blogger and Wix) do not touch WordPress when it comes to customizations, ease of use, and popularity. WordPress powers over 455 million websites on the internet as of 2022, hence you’ll be in great company. In a separate article, I’ll cover the advantages WordPress has over other free blog websites in greater detail. This article will teach you how to create your free blog site and install themes.

Creating Your Blog Site

  • Visit the WordPress website here
  • On the top right-hand corner of the screen, click on get started
  • On the next screen, type your email address, desired username, and a unique password. You’ll be required to log in with these credentials. You can click on “Continue with Google” or “Continue with Apple” if you’re accessing WordPress from a device already logged in to Google or Apple.

When your name and password check out, proceed to the next step of choosing your domain name. This is a tutorial for a free website but if you are willing to spend some bucks on a domain name, you can do that. 

  •  If you already own a domain name, you can connect it by clicking on the “Use a domain I own” button to set it up.
  • Type your desired domain name in the search bar. WordPress will load up recommended and available domain names you can use. The top two paid domain names will be displayed first. Below that is a free domain with your name + numbers. It also ends with .wordpress.com (e.g. www.blackread234332.wordpress.com). Click on it to accept the domain name.
  • In the final step, WordPress will require you to choose the plan you want. Again, if you want to pay for that, you can go ahead and then select the WordPress Starter or WordPress Pro plans. Since we’re going for the free version, click on “start with a free site”.
  • Click on Skip to Dashboard. We’ll set up the website before writing our first post.

Now it’s time to set up and install a theme for your blog website. WordPress will install a default theme on your site. If you’re cool with it, you can skip this part. WordPress has a ton of free and premium themes to choose from. To set it up:

  • Click on Appearance on the left menu and select Themes.
  • Scroll through the hundreds of themes and select the one you want.
  • Click on the “Activate this theme” button.
  • You can either stick with your homepage content or replace your homepage with the theme’s homepage. You can choose the latter if you have no content yet and want a fair idea of how your website would look. You can edit the theme’s homepage later so no need to worry.
  • Click on Activate.
  • Wait for the theme to install. It should take a few seconds. Once it is done you can go ahead to edit your website to suit your vision.

In subsequent posts, we’ll look at how to create, edit and publish your first posts. Hopefully, this was able to help you create your website. If you have any questions, feel free to ask in the comments.


Three Ways to Improve Your Online Presence.

When it comes to improving your online reach, it can feel like it is not in your hands and entirely luck. Content creators and online businesses have blown up in what may seem like overnight. Even though it may be down to chance, you can manipulate that luck to work in your favor. In this article, I’ll be discussing three ways you can improve your online reach and grow your business.

Having a Website

Just like having an official local address for your business so your customers can access your services, you need an online address where potential and previous customers can find information about your business and services. Your website is the address of your online space as a business and allows you to control the narrative about your business. Your website must be intuitive, clean and easy to navigate. It should have your contact information, business location, and services you offer as a business. Having a good website means that your website can be indexed by google and shown in the Google Search results. Therefore, customers searching for particular services will trigger your website to show organically.

Social Media presence

Social media offers something incredible that other means cannot provide: instant feedback and communication. Business owners have direct access to their fans and customers. Whether it is updating customers on promotions or uploading new products, businesses have an avenue to engage potential customers on the fly. Customers can message businesses directly and get the information they want on whatever services are required. Thus, owners can close clients without having them come to their local offices. Powerful social media tools can help companies measure and grow their following and reach. Having a social media presence also improves a business’ overall online presence by increasing its position and visibility on Google search results.

Google Ads Campaign

Like using traditional means of advertisement (TV and radio) to gain traction for your product or service, Google Ads can bring traffic or attention to your business online. There are more than 100 million people on the internet daily, so running a Google advertisement can help you tap into that audience to grow your business. Unlike TV and radio, you can measure the impact of your ads. Google’s advanced analytics and measurement tools can help you determine how many people saw your ads, clicked on your website, or even converted. You can also tailor your ads so only certain groups can see them, giving business owners as much control as they want. With Google’s brand awareness Ads module, you can build and grow your online presence on the millions of websites and applications affiliated with Google.

These are some surefire ways that have worked in the past consistently. However, you need to be dedicated and patient to ensure magnificent results. It may not happen overnight, but it will sure work. Make sure to put these measures in place and watch your business continue to grow online.